Welcome to Kampina Documentation

Welcome to the "Kampina" Wordpress Theme by TigriWeb Team. We are very pleased that you have chosen "Kampina" theme for your website, you will not be disappointed! In this documentation you’ll find almost everything related to this theme. If you find something that we missed to explain or have any questions, please create a New Topic on Support Forums.

Documentation info:

Version: 1.0
Created: 22.07.2023
Latest update: 22.07.2023

WordPress Codex information

  • Installation – WordPress is easy to install;
  • Pages vs. posts – Understand the differences between posts and pages;
  • Posts – The articles/posts represent the content;
  • Pages – They have multiple usage from homepage to contact, from blog page to presentation pages, etc.;
  • Categories – Structure your content using categories;
  • Tags – Group posts which have similar content;
  • WordPress Block Editor – The Gutenberg editor;
  • Blocks list – Default components for adding content in the Gutenberg editor;
  • Adding a new block – How to add blocks using the Block Inserter.

settingsInstallation

chevron_rightDownload Package

At first, after purchasing this theme, please download the package from Themeforest. All you need to do is move your mouse over your login name in the right top corner and then click Downloads.

Kampina Theme Download Package

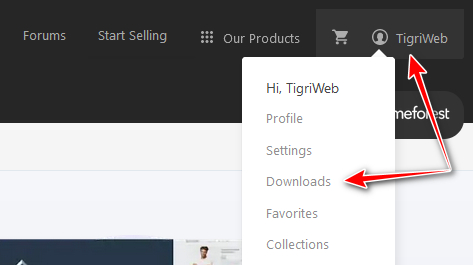
Here you will find all the items that you have purchased.

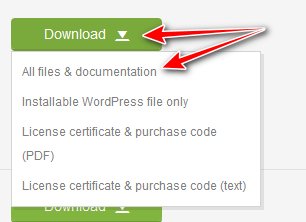
At the next step click the Download → All files & documentation button next to Kampina theme and save package to your computer.

Kampina Theme Download Package

chevron_rightInstalling & Activation

You can find things like: documentation, license, zipped file with theme files and сhild-theme zip archive in the package. Extract the package to a folder on your local computer.

You can complete installation in two different ways:

  1. WordPress Theme Manager - please go to Appearance → Themes → Add new → Upload Theme, select theme folder called kampina.zip and press Install Now button. The wordpress will do the rest for you.
  2. FTP upload - upload non-zipped theme folder called kampina to /wp-content/themes/ folder in your WordPress installation folder on your server. If you are not familiar with FTP or looking for any FTP software, FileZilla is easy to use.

When the installation is complete​, your Kampina theme will be ready to use.

chevron_rightInstall Plugins

In order to extend theme functionality, theme comes with several plugins. You will see a window with an offer to install required and recommended plugins after theme activation.

You can also install and activate the plugins in Appearance → Install Plugins.

Required plugins:

  1. Kampina Core: Extend Basic Theme Functionality.

Recommended plugins:

  1. One Click Demo Import: Import your demo content, widgets and theme settings with one click
    (After importing, you can uninstall this plugin).
  2. Save SVG: Enable SVG uploads and sanitize them to stop XML/SVG vulnerabilities in your WordPress website
    (After importing, you can uninstall this plugin).
  3. Envato Market: This toolkit plugin establishes an Envato Marketplace API connection and recommended for update theme automatically.
  4. WooCommerce: Is a free eCommerce plugin that allows you to sell anything.
  5. Contact Form 7: Just another contact form plugin. Simple but flexible.
  6. MC4WP: Mailchimp for WordPress: Allowing your visitors to subscribe to your newsletter.

chevron_rightRegenerate Thumbnails

If you install Kampina theme on a website that already has images uploaded, please use the Force Regenerate Thumbnails plugin to resize all thumbnails.

This plugin allows you to delete all old images size and REALLY regenerate the thumbnails for Kampina theme image attachments.

To regenerate images, follow this steps:

  1. Go to Tools → Force Regenerate Thumbnails;
  2. Click on Regenerate All Thumbnails and wait until it is finished.

syncUpdate Theme

It’s recommended to create a backup copy of your site before its update.

There are several variants of theme update:

chevron_rightAuto Update

Kampina theme recommends some plugins after installation. One of them is "Envato Market" which automatically alert you on your dashboard when a new version of the theme is available.

If you haven’t installed the plugin yet, follow these steps:

  1. Go to Appearance → Install Plugins;
  2. Hover over "Envato Market" and click "Install Plugin";
  3. Go to Appearance → Install Plugins;
  4. After you install the plugin you’ll see "Envato Market" button on the left menu.

To establish an Envato API Connection navigate to the Envato Market page and insert your Envato API Personal Token in the designated input field.

On the Envato Market plugin page you will find instructions on where to get the Envato API Personal Token.

chevron_rightUpdate Manually

This method requires more steps and manual work. We advise to make a backup of your site before theme update.

For manual update you need to download a new theme version from your account to Themeforest (there is an instruction above in the paragraph “Installation”). Once you have the new theme package, you can choose to upload the theme via WordPress or via FTP.

How To Update Your Theme Via WordPress?

  1. You need to deactivate the current Kampina theme located in the Appearance → Themes section (Simply activate another theme). Once you activate a different theme, you can delete the Kampina theme (If you are using child theme, keep it as is, delete parent theme only). Dont worry, your content will not be lost.
  2. You need to unzip the downloaded archive file you received to get the kampina.zip file inside.
  3. Upload the kampina.zip file to the Appearance → Themes section by clicking on the "Install Themes" tab at the top and then choosing to upload the zip file.
  4. Once it finishes uploading, choose to activate the theme.
  5. In the end, update the included plugins. You will see a notification message letting you know a new version of the plugins are available and need to be updated.

How To Update Your Theme Via FTP?

  1. Go to wp-content → themes folder location and backup your "kampina" theme folder by saving it to your computer, or you can choose to simply delete it. Your content will not be lost.
  2. You need to unzip the downloaded archive file you received to get the "kampina" folder inside.
  3. Simply drag and drop the new "kampina" theme folder into wp-content → themes folder location. Choose to Replace the current one if you did not delete the old "kampina" theme folder.
  4. In the end, update the included plugins. You will see a notification message a new version of the plugins is available and needs to be updated.

tvDemo Content

Demo Content is recommended to be established at the clean Wordpress version. The installation doesn’t replace or delete already added posts, pages, products, media files.

How to install Demo Content?

  1. Install and activate required plugins and if necessary recommended ones (Appearance → Install Plugins);
  2. Go to the page Appearance → One Click Demo Import;
  3. Press the Import Demo Data button;
  4. Press the Continue & Import button;
  5. Wait untill demo is installed.

Menu creation works as in default Wordpress. To setup a new menu, please follow the steps below.

  1. Navigate to Appearance → Menus page
  2. Click the Create a new menu link to make a new menu. Enter the name then hit Create Menu
  3. To add a menu item, you can easily select one of your already made pages on the left hand side and click Add to Menu
  4. You can also add menu items by entering a custom name and custom link into the Custom Links box.
  5. You can manage your menus using the drag and drop functionality. To create a dropdown menu simply drag a menu item from below and slightly to the right of another menu item and it will lock into place and create a dropdown section.
  6. After menu settings are done, you should choose theme location where it will be displayed.
  7. Once it’s all been done, make sure you click the Save Menu button.

A WordPress Widget is a small block that performs a unique function. Widgets can be added to widget-ready areas of the theme called sidebars.

Kampina theme has some pre-made sidebars and also allows you to create an unlimited amount of custom sidebars.

Navigate to the Appearance → Widgets tab to access the list of widgets and sidebars.

Pre-made theme sidebars:

  • Area 1-5 – can be selected in the Page/Post/Category/Tag Options;
  • Footer Top – displayed on top of the footer;
  • Footer Column 1-4 – displayed in the footer;
  • Footer Bottom – displayed on bottom of the footer.

tuneCustomize

You need to install the "Kampina Core" plugin before using "Customize" functionality. To do this go to the Appearance → Install Plugins in the Admin Panel.

Customize panel has been especially created to make your work faster and easier. Using it is very easy and in just a few minutes you can change a lot of things on your page. Navigate to Appearance → Customize to make changes.

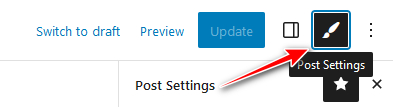
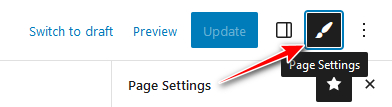
These options are all global options which means any option set in Customize will affect your entire website. If you want to set more specific options for a particular page or post, you can set them in Post/Page Options, which is located in every page or post.

Always remember to click Publish button. Without that you will lose all your changes.

chevron_rightSite Identity

In this section you can set up some general options for your site, such as Logo, Site Title, Tagline and Site Icon.

chevron_rightColors

In this tab you can transform your site beyond recognition. Set up Theme colors, Header colors, Hero colors, Content colors, Footer colors and Fields colors as you want.

chevron_rightMenus

This panel is used for managing the navigation menus for content you have already published on your site. You can create menus and add items for existing content such as pages, posts, categories, tags, formats, or custom links.

chevron_rightTypography

Set up fonts of the site. We offer a choice of hundreds of fonts that connect with the help of Google Fonts. And we’ve done a preview area of the text with selected options for you to choose a suitable font comfortably.

chevron_rightWidgets

WordPress 5.8 introduces blocks to the Widget Editor and lets you add any block to the sidebars and other widget areas in the theme using the all new Widgets Editor.

You can configure the Widgets via Appearance → Widgets menu.

chevron_rightHomepage Settings

You site’s home page can either contain your latest posts or display a static page or post.

chevron_rightAnnouncement Bar

In this section, you can enable/disable the Announcement Bar and add/remove its slides.

chevron_rightGlobal

In this section, you can modify the Layout settings and the maximum width of the content blocks.

chevron_rightSingle Types

In this tab there are settings of layout/appearance of single pages for each post type that is included in the theme. By means of it you have a possibility to set up single pages in detail in different parts of the site.

chevron_rightArchive Types

Kampina theme has an opportunity to create individual settings for different archives of posts (Archive / Blog, Post Tag, Search, Category).

chevron_rightWooCommerce

This tab has some options for WooCommerce plugin.

chevron_rightAdditional CSS

A panel that lets you add CSS code which will override the current theme.

chevron_rightHooks

It’s a section where you can put some code (e.g. HTML) that allow you to show different things and elements in places that are not available from other tools. For example if you want to put some code before header (banner or information about cookies), then put code in Body Before field.

edit_documentBlog

chevron_rightCategory Options

To create categories navigate to Posts → Categories. You will see a form for creation of a new category from the left side and a form for editing of earlier created categories from the right side.

Kampina theme allows you to manage your categories more customizable than default wordpress category functionality.

You can change many options for each category, such as sidebar settings, posts layout & pagination, hero and other. Check category add/edit screen to manage these options.

chevron_rightPost Settings

You can configure any post using the sidebar named "Post Settings," which is located at the top right of the post editing or creating window.

Kampina Post Settings

descriptionPages

Pages are the backbone of your website, and most likely you will setup several of them. Pages are a blank canvas that allow you to add content with shortcodes elements or Gutenberg blocks. Also, there are different page templates to choose from, each serving a purpose to help you build a site.

You can configure any page using the sidebar named "Page Settings," which is located at the top right of the post editing or creating window.

Kampina Page Settings

local_mallWooCommerce

Kampina is fully compatible with WooCommerce plugin. We carefully created whole design so you can get very nice shop with tons of options and all looks perfect with theme design. WooCommerce is an external plugin and all info about this awesome plugin you can find on plugin's author page.

Below you have all friendly links that will be useful:

How to install WooCommerce and setup the default shop pages

  • Step 1 - At first please go to Plugins → Add new section and type "WooCommerce" into search field. Then click Search Plugins button.
  • Step 2 - After that you will see results and what you need to do is click on Install now button next to "WooCommerce" plugin.
  • Step 3 - After that plugin will be installed please click Activate plugin link.
  • Step 4 - Later you will see a WooCommerce Purple Notfication Bar at the top of the plugin page. Click the Install WooCommmerce Pages button in the purple bar to install all the default pages.

Please Note: Once you are done installing WooComerce and the default pages, you can go to the Appearance → Menu section of your admin and choose to add all the WooCommerce pages to your menu. They will be listed at the top under the most recent pages.

How to add new product

Go to Products → Add product section. After that you will see page which looks like below and all you need to do is fill those fields with own values.

All info about adding new product you can read on this link.

translateTranslations

chevron_rightStandard

Kampina theme allows you to translate the theme into any language. To translate the theme:

  • Step 1 - Download and install POEdit translation editor
  • Step 2 - Go to the theme translation folder /wp-content/themes/kampina/languages/
  • Step 3 - Make a copy of the file kampina.pot and rename the file to the locale of your language. For example, German would be de_DE.po, Arabic would be ar.po. See language code list here (column WP Locale).
  • Step 4 - Open POEdit and load the file. (i.e de_DE.po)
  • Step 5 - Translate all the strings in the list and save changes. After you save, you will have two files. (i.e. de_DE.po and de_DE.mo)
  • Step 6 - Upload these files to /wp-content/themes/kampina/languages/
  • Step 7 - Go to Settings → General and select Site Language

chevron_rightWith Loco Translate

Installing Loco Translate:

  • Step 1 - Install and Activate - Loco Translate Pluggin;
  • Step 2 - Go to Loco Translate → Home → Active Theme → Kampina;
  • Step 3 - Create New language;
  • Step 4 - Choose a language, choose a location themes/kampina/languages/de_DE.po and Start translating;
  • Step 5 - After translating click on Save button.

chevron_rightWPML Integration

If you want to have multilingual website, this is the best way to do it. If you want to use this plugin, you must purchase it first and then install into your wordpress installation.

Below we serve links that will be useful for WPML plugin:

helpFAQ

How to set a page as homepage?

  • Go to Settings → Reading or Appearance → Customize
  • Click Static Front Page
  • Select your page in the Front Page

How to install favicon?

A favicon (short for "favorites icon") is an icon associated with a website or webpage intended to be used when you bookmark the web page. Web browsers use them in the URL bar, on tabs and elsewhere to help identify a website visually.

To install a new favicon go to Appearance → Customize → Site Identity → Site Icon and upload it.

How to Include Google Analytics Tracking Code?

  • Copy the code given to you by Google Analytics
  • Go to Appearance → Customize → Hooks
  • Paste your Google Analytics (or other) tracking code into the Head textfield.
  • Click Publish. That's it!

How can i change or display author/user avatar?

To change user avatar (seen on author box, comments or author page template etc.) you have two options:

  1. Wordpress fetches user avatar automatically from your Gravatar.com by default. Create a free account at gravatar.com and make sure the email of the user is the one used to create the Gravatar account.
  2. You can install some plugin which will allow you to change the user avatar instead of registering gravatar. For example, check this plugin called WP User Avatar.

cognitionSupport

If you have any issues about installation or find any bugs related with Kampina theme, you can create a New Topic on Support Forums. As a first step you should create an account. You will need your envato purchase code for registration.